|
|
Shapes | Materials | Collecting | Attaching& | Where | Lifestyle&Biodegradability | About |
|
|
Shapes | Materials | Collecting | Attaching& | Where | Lifestyle&Biodegradability | About |
|
|
|
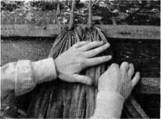
Attaching the Fronds on to the Roof
For Royal and Coconut palms: First, trim the leaf stem to approximately three feet; then, nail or tie the frond stem to a cross beam on the roof.
Please note: different methods are used for attaching pinnate leaves (the fronds extend from a main nerve / midrib) and palmate leaves (the fronds finger out like a hand from a central point).
Figure 3A. Space cross beams 6 inches apart if using saw palmetto (12 inches if using cabbage palm). Place fronds snugly together on the beam, one at a time from one side to the other until you complete that row a thatch around the whole roof, then complete the next row up, and repeat the process until you reach the peak of the roof.
Figure 3B. Place fronds on the cross beams from bottom to top, work your way around the roof, from the bottom to the peak.
How to Thatch: 1,2, 3...
1. Putting together the roof framework: space your cross beams 6 inches apart if using saw palmetto; and 12 inches apart if using cabbage palm.
2. Place each frond on the cross beam, flat-side of the palm stem down, one at a time, from one side to the other, from the bottom to the top, as snug as possible on the cross beams of your roof structure. Place a 2-3" staple in the frond at the base of the stem (from the central point where the frond fingers out, i.e. when using a palmate leaf type). You may want to experiment with various methods of attaching the fronds. For example, various plants can be used to tie fronds on, such as grasses, sedges, rushes, and palm fronds.
3. Overlap your palm fronds placing them as tightly together as possible in order to create a roof that keeps water from coming in to the chickee.
Hint: When you harvest and start to learn how to use the fronds, remember that fronds have a natural shape that allows them to collect water for the palm plant. The palm uses its natural shape to shelter various animal species from rain. You are using the natural quality of the frond to create a roof to shelter you from rain.
Poles and Frame
The number of poles you use depends on the shape of your chickee — that is, if your chickee is circular or square or rectangular. Position the poles according to the dimension and shape of the chickee.
For the roof frame, attach struts, boards or small diameter trees from the length of the top of each pole to the center of the chickee. Strut length depends on the desired pitch of the roof. Place crossbeams on to the struts for attaching thatch on to, either 6-inches apart (for saw palmetto) or 12-inches apart (for cabbage palmetto), starting at the bottom and going to the peak of the chickee roof. The length and number of cross-beams you need depends on the size and shape of the chickee.
Cypress trees are often used as poles for a chickee frame. Today hardwoods and pines are also used. Palm tree trunks are also used for poles. Try not to use a soft wood. Softer wood, like water oak, rot quickly, decreasing the overall life of the chickee.
|
|
|